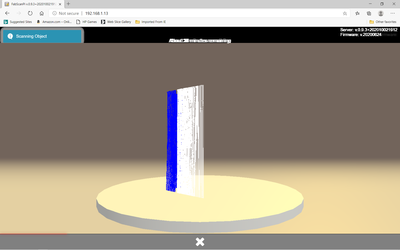
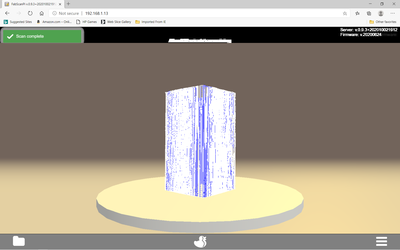
Nach etwas längerer Zeit habe ich mich wieder mit dem FabScan beschäftigt.
Ich habe das gleiche Problem, das ich auch damals schon hatte.
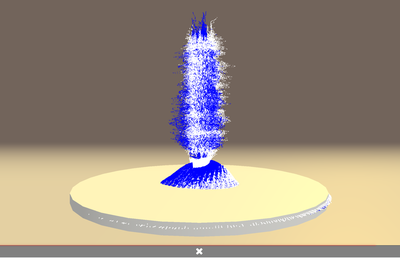
Mein Objekt wird gescannt, aber oben drüber entsteht ein unregelmäßiger, dicker „Turm“.
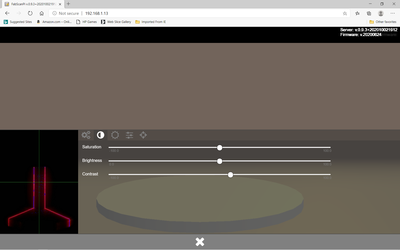
Ich habe wie in dem anderen Thread empfohlen saturation und brightness verstellt, komme aber so
auch zu keinem brauchbaren Ergebnis.
Woran könnte es noch liegen, bzw. was könnte ich noch versuchen?
Liegt es vielleicht an der Cam und ich sollte mir eine andere besorgen?
With my small amount of experience here are my suggestions.
It looks like your may be getting a lot of what I call bloom (at least a cloud of light scatter). I Recommend trying a simple object first such as a cubic figure-for example in the plan view a rectangle 50mm across the diagonal, which will have 35.35mm faces and perhaps 75mm height. Anyway start with a simple nonreflective figure. We will assume that default.config.json file has been edited to the recommended values and the calibration has been run and you have the latest software image installed.. Also for reflective object it has been suggested by others that a spray chalk coating, flour, etc.to dull the surface be used. If you have a 3D printed part or figure made of wood this shouldn't be necessary.
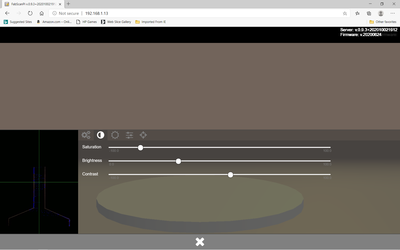
I usually have to reduce the saturation down towards -80, brightness to 30 and usually leave the contrast at the default setting. Your settings will probably be different as the Wetterott lasers are 1 mWatt while I'm using cheap 5 mWatt lasers. The intent is to have a single line without the bloom show on the preview.
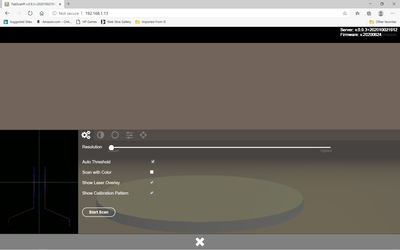
Uncheck the color (texture scan) as it will not be good with the adjustment of lighting parameters. I see that Mario has it on his todo list to make the texture portion of the scan independently adjustment.
If you are not sure of the stepper motor-200 or 400 step per revolution, try the following. It is difficult from your scan picture to determine which motor you may have and in addition to know if your stepper driver is configured correctly, specially if the Silent Step Stick Driver is not a TMC2100.
I recommend the resolution slider to the far left (lowest resolution) which will give you vertical scans every 8 microsteps (400 for a 200 step stepper or 800 for a 400 step stepper)- for determining which stepper motor you have, you could change the 6400 to 3200 in the default.config.json file- you will get a half revolution- 180 degrees if the stepper is a 400 step motor else 360 degrees if it is a 200 step motor. If you do not get either a 180 degree or 360 degree rotation it is an indication that the step stick driver is not configures to 16 microsteps.
This may be enough to get a decent scan without changing the threshold setting, if not mess with it a bit.
I will try to attach some screen shots showing default setting, adjusted settings for scanning, scan set - up at that point and a finished scan plus a zipped cubic STL file.
Thank you.
With your hints and especially with the screenshots it worked now.
The image is very dark because of the reduced brightness, especially when scanning with color. But the strange tower is gone now. Is there a way to optimize the hardware to get brighter scans?
Is there a way to save the settings (saturation and brightness)?
I'm happy it is working for you. Now that you have some success and some exposure to everything it would be a good time to review the documentation, the FAQ's and the forum subjects.
To answer your specific questions which are from knowledge I have gained from doing the same:
The settings for obtaining a good scan are not good for the color (texture) portion of the scan. Mario has on his todo list to provide a separate settings menu for the color portion. I believe that the greater portion of users have intentions of using the scanner to 3D print their scans and the color information is of limited value.
After the scan, the right drop down menu allows you to save the .ply files to your browser host computer. The scan files are saved to the SD card of your scanner. They can be accessed from the index card icon on the left by clicking on it and selecting the icon of one of the scans which shows and it will be loaded. This allows you to review past work or to delete the scan from the SD storage if not wanted. It also loads your settings used for that scan. You can click on the ducky icon to start a new scan with those settings. I think you have to select the resolution each time. You only need to perform one calibration at the beginning or recalibrate if the physical location of lasers, camera, etc. have been disturbed. I included the cubic .stl file as I think it would be a good way to estimate the accuracy of your calibration and also it is an easy object to scan for practice.
Of course the .ply file must be converted to a .stl file to create the 3D printer gcode. I think user Danilo (not sure of spelling and can't easily check while in reply mode) would be a good advisor as that person has much more experience in the process than myself.
@Zutcliff When the scanner is running, the most important thing is to have a proper calibration. Since this now only takes 2-3 minutes in 0.9.4, I've got used to doing one before each use.
I built a template from 3 right angles and the exact distance from the lens to the center plate. That allows me to get the Shett right. Then I align the lasers so that they are 100% on top of each other. Then I move the Shett 10 mm towards the camera and start the scan.
When I'm done, I access the Pi via ftp (Filezilla in admin mode) and download the scans. I then process these with Meshlab and CAD.
The download directly from the browser window does not work and he does not need that either. External editing has many more options. I don't worry about this "tower" anymore. This can be easily removed in Meshlab.
I am German and speak several languages and only a little bit of school English
@zutcliff , ich vergass zu erwähnen, kauf das Buch von Mario. Da hast du den kompletten Prozess von Anfang bis zum Ende bestens anhand von Bildern und Schritt für Schritt Anleitungen erklärt --- und noch vieles mehr ... Kann ich nur wärmstens empfehlen. Darin werden 99% aller hier auftauchenden Fragen erklärt.

